Atlantis (ENG)
Atlantis
![]()
What is Atlantis
Atlantis is a self-hosted terraform pull request automation tool.
You create a pull request to Git repository (Github, Gitlab, Bitbucket) with terraform source. Then, if you type atlantis plan (or set up autoplan), Atlantis will terraform plan for you. Once you fulfill apply requirements (ex: approval), if you type atlantis apply , Atlantis will terraform apply.
This is definitely helpful for developers who use terraform for following reasons:
- With Atlantis, you can simple track resource version and share terraform codes. Without Atlantis, people should plan and apply in local, which can cause a turmoil in resources. Using Atlantis is way safer!
- Since you use pull request, you can get a code review before you apply changes.
- You can check detailed logs easily in pull request
- With Atlantis lock, you can prevent any additional plans to same resources.
In this document, I will illustrate how you can set up Atlantis using AWS, Github App and Kubernetes (helm chart).
How to set up Atlantis
1. Set up Atlantis Github App.
First, visit your organization and press developer settings. Click Github App and create a new Github App with name that you want. Create Webhook URL and Homepage URL. Webhook URL should be Homepage URL + /events . (Make sure to enable webhook)
Homepage URL: www.atlantis.example.com
Webhook URL: www.atlantis.example.com/events
Provide necessary permissions for Atlantis.
Add webhook secret. You can generate webhook secret and add it to your Github App. This will be used during deployment
Finally, generate private key. Don’t forget to save it somewhere safe, since you have to use it during deployment (I saved private key to Hashicorp Vault) . For better explanation, check this video.
2. Prepare a service account
Next, create a service account and appropriate IAM roles.
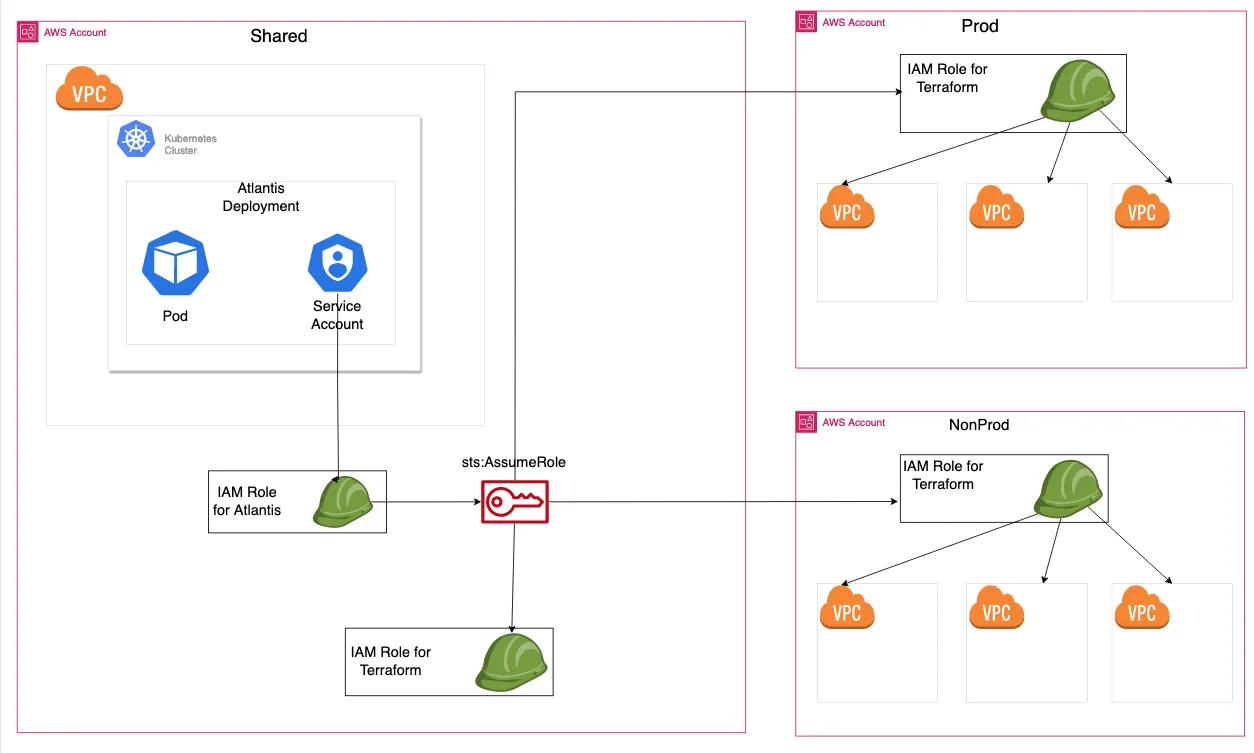
For IAM role, you need to create mainly two roles, IAM role for Atlantis and IAM role for terraform. IAM role for terraform is required when you create multiple AWS accounts.
IAM role for Atlantis will be created using IRSA (IAM role for service account). This role will have an authority to sts:assumeRole to other roles, specifically IAM role for terraform.
IAM role for terraform should be created on each AWS accounts. The role should be similar to AdministratorAccess, since Atlantis should create multiple resources.
Inside Atlantis helm chart, you can set serviceAccount.create to true and provide annotations of [eks.amazonaws.com/role-arn](http://eks.amazonaws.com/role-arn) , which will be ARN of IAM role for Atlantis.
3. Edit values for Atlantis helm chart
Inside Atlantis helm chart, you should mainly edit four parts: githubApp, orgAllowlist, ingress and secrets.
For githubApp, make sure to provide [githubApp.id](http://githubApp.id) that you can check from Atlantis Github App. You can provide key directly, but I chose to provide by secret for safety.
For orgAllowlist, you should add your own repo allow list. It will be something like gihub.com/example/*
Ingress should have same host and homepage url set in Atlantis Github App.
Secret is used to provide github_secret (webhook secret) and key.pem (githubApp private key). For my case, I have used Hashicorp Vault and used secret provider class to import as secret atlantis-secret. I have configured the process in extraVolume and extraVolumeMount . Finally, provide secret name to vcsSecretName to make sure secret value is configured properly.
--
# secretprovider.yaml
apiVersion: secrets-store.csi.x-k8s.io/v1
kind: SecretProviderClass
metadata:
  name: "atlantis-secret"
spec:
  parameters:
    objects: |
      - objectName: key.pem
        secretPath: "example/atlantis"
        secretKey: "key.pem"
      - objectName: github_secret
        secretPath: "example/atlantis"
        secretKey: "github_secret"
    roleName: atlantis # make sure to create role name prior to the process
    vaultAddress: https://vault.example.com
  provider: vault
  secretObjects:
    - data:
        - key: "key.pem"
          objectName: key.pem
        - key: "github_secret"
          objectName: github_secret
      secretName: atlantis-secret
      type: Opaque
--
# values.yaml
# Optionally specify additional volume mounts for the container.
extraVolumeMounts:
  - name: "atlantis-secret"
    mountPath: "/etc/vault/atlantis-secret"
    readOnly: true

# Optionally specify additional volumes for the pod.
extraVolumes:
  - name: "atlantis-secret"
    csi:
      driver: secrets-store.csi.k8s.io
      readOnly: true
      volumeAttributes:
        secretProviderClass: "atlantis-secret"

vcsSecretName: 'atlantis-secret'
In addition, you can set up server side repo config. You can create pre/post hooks and choose plan/apply/import requirements. However, you can set up individually in each repo with atlantis.yaml file, and one configured in helm chart will be a default configuration.
4. Use Atlantis
Now you can freely use Atlantis! One thing that you should know is that you should provide role_arn in backend.tf and provider.tf. The role should be IAM role for terraform, which Atlantis will assume.
# provider.tf
provider "aws" {
  region  = "ap-northeast-2"

  assume_role {
    role_arn = "IAM ROLE ARN FOR TERRAFORM"
    session_name = "atlantis-session"
  }
}

# backend.tf
terraform {
  backend "s3" {
    bucket  = "atlantis-test"
    key     = "iam.tfstate"
    region  = "ap-northeast-2"
    role_arn = "IAM ROLE ARN FOR TERRAFORM"
  }
}
Now type atlantis plan/apply.
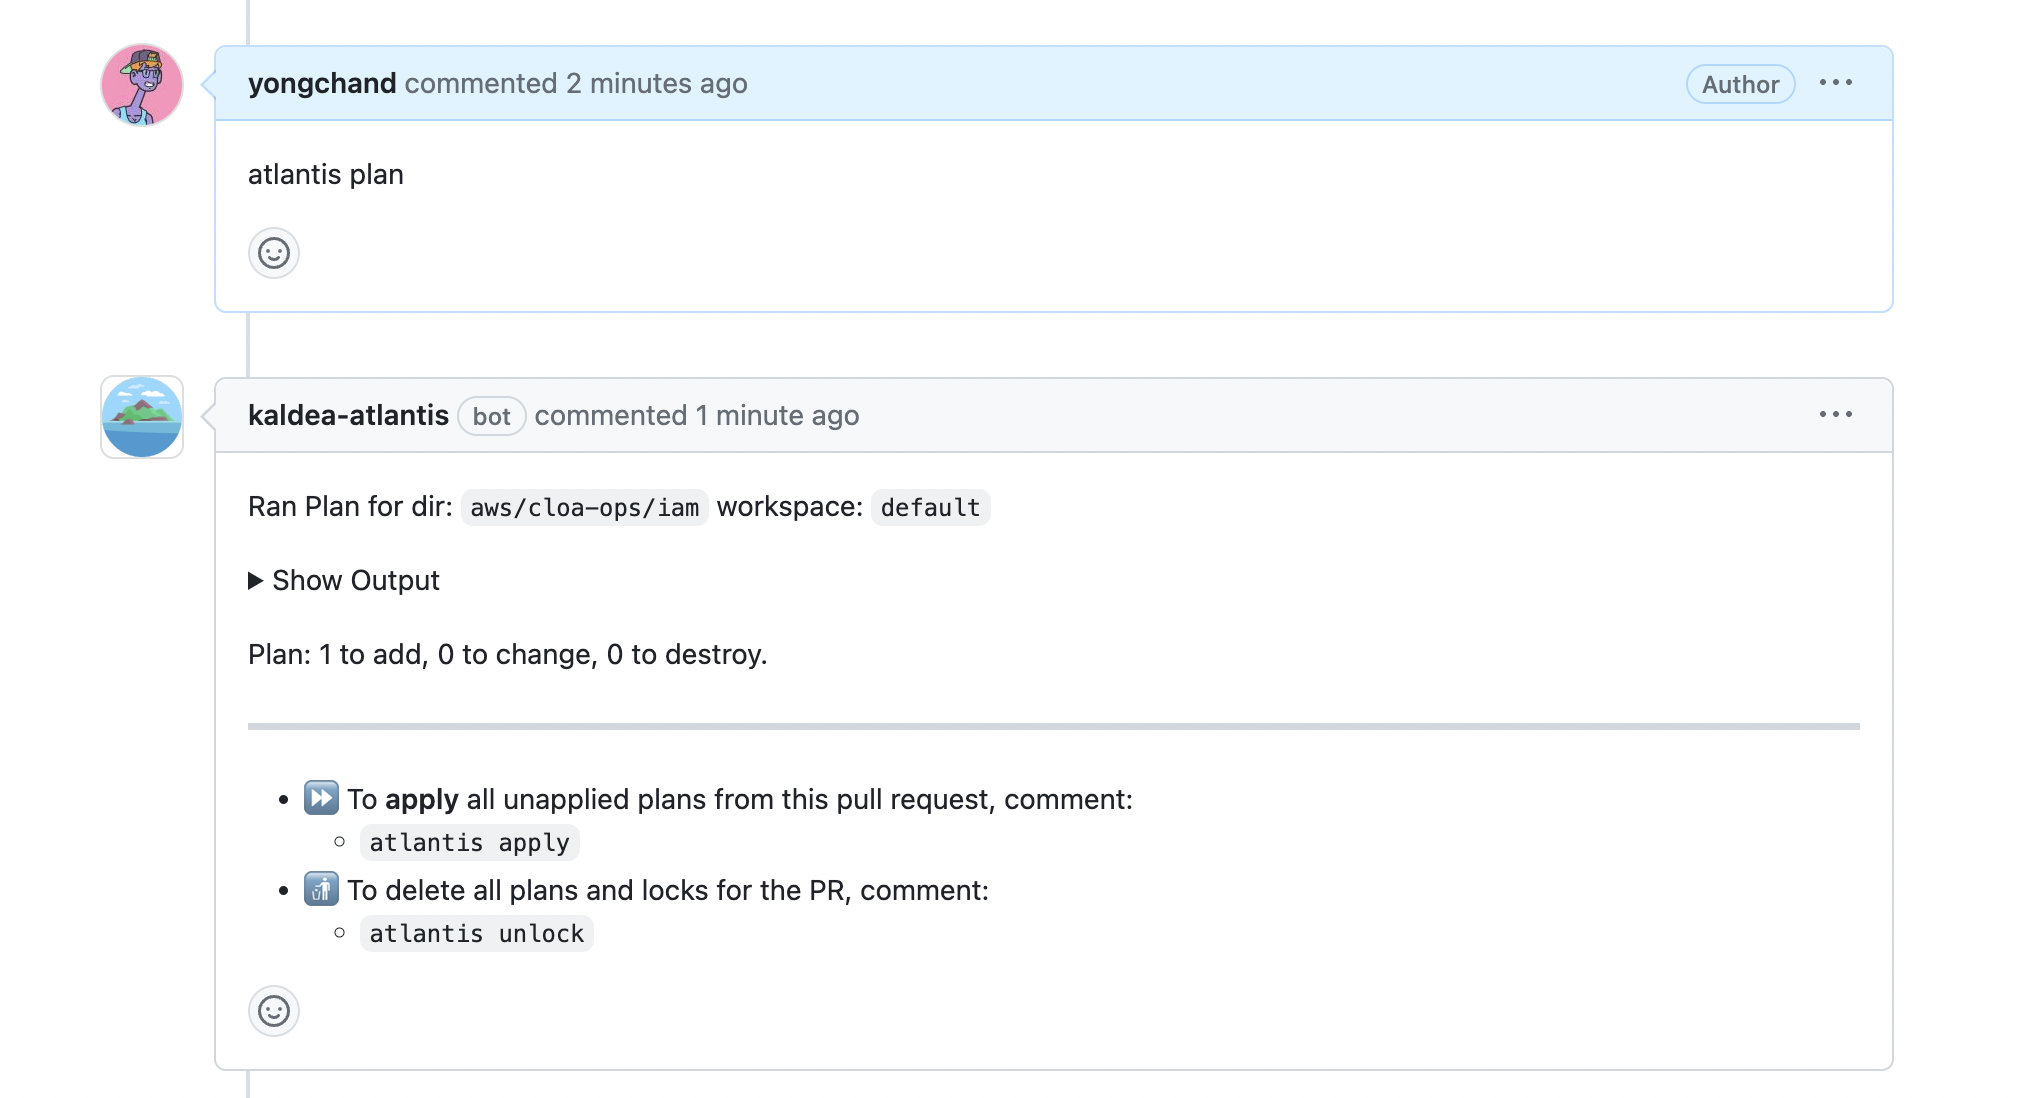
Voila! Now you can use Atlantis! You will use atlantis plan and apply for most of the times, but you can check docs for other commands.
On the next post, I will denote some lessons that I learned through trial and errors.
Reference
https://www.runatlantis.io/docs/
https://docs.aws.amazon.com/eks/latest/userguide/iam-roles-for-service-accounts.html